Saturday, December 21, 2013

Excavation Please

You got a taste of the big hole that is now on the North side of the house from the last post. I thought however you'd like to see the process (spoiler: it includes some exciting demo too). 

We started with one excavator, but it turned out to be too small to do the job. 

So we got a bigger one!

This was the hole that was left from removing the big tree stumps. Did I mention they were big?


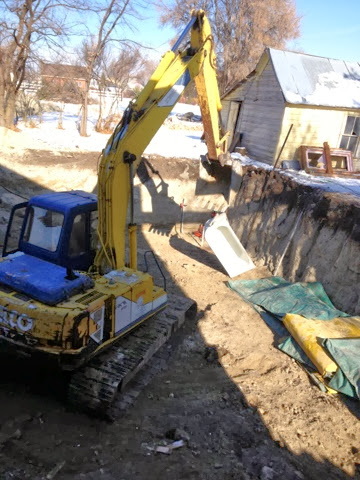
The weather turned colder just at the wrong time. (Note for next time: don't build in the winter. Check.) We thought the frost had only gotten about six inches into the ground, but on the shady North side it was probably more like 20 + inches.  Those aren't boulders in the hole, just big slabs of frozen dirt. The excavators had a hard time getting through. 

Checking the depth. 


The next step was to put the new beam to the test and take out the supporting structure and floor below. 


All that had to go. 


Supporting walls and floor joists had to be cut and separated from the remaining house. It took a lot of work, and  had many great volunteers helping that day. I couldn't have gotten it done without them! Thank you!

All exposed. The bathtub was imbedded  about an inch and a half into a six inch concrete slab. It had to come out the same way as everything else. 


The cast iron tub goes on its final ride. It will be used in another location. 

The tub was an interesting pre/early Art Deco piece. You can see from the stamp on the bottom that it was the Pembroke model; manufactured on 9/15/1917!

 The dangling part of the stairs were all that was left to take off. 

The final product. The hole feels awfully deep with the house hanging over the top. 

A strange view out the back door. That first step's a doozy!


Monday, December 16, 2013

Beam Me Up

Doesn't every house have a 16 1/2" tall 60 foot long beam in it? Hmm?

So that we could remove a portion of the first floor and cellar that would be tied-into, and replaced, by the new addition, we had to support the second floor and remaining roof. Somehow. . . 

Luckily (except as it relates to the budget!), we needed a 60 foot beam to use on the roof ridge. We decided to have it delivered early so we could use it as a temporary support. 

A crane is the best way to move a big beam. It's very nice to live in a town where many neighbors have very large equipment!


It started on the West side. . .


Over the house. . .


Now on the East side!

 
We had to maneuver the beam through the tree and "thread the needle" by moving the beam into the house and through a hole we made in the wall that was just big enough for the beam. 

We supported it in the yard on one side and in the downstairs bedroom on the other.  Kinda hangin' out in space you know?


Tuesday, December 10, 2013

We Decided the House Only Needs Three Sides

In order to combine the old and the new sections of the house we needed to remove the brick wall on the North side. This required framing a temporary support wall inside, cutting the brick, bringing the wall down, and removing the brick. This process took place over a few days. 
New wall

It takes big saws to cut the brick. Those ten inch blades didn't even go all the way through. These walls are thick! 


Time to bring it down. . .

 After quite a bit of sledgehammering we put chains around the top of the wall and through the window. Then we pulled. 

That dust cloud on the right is what was left of the chimney falling. 
The wall is three courses thick and very well built. I thought it would come down easy, but it was pretty solid and required quite a bit of chipping away at it. 


I just can't help myself from making big messes! 


The sewer vent pipe has to come down somehow also.  Any volunteers?


All tarped-up; waiting for the snow.